本文介绍在redhat 7上升级openssh 8.5 p1的方法,包括openssl的依赖升级。
目录导航
挂载yum源
编辑配置文件
#vim /etc/yum.repos.d/my.repo添加如下信息
[my-yum]
name=Red Hat Enterprise Linux 7.3
baseurl=file:///run/media/root/RHEL-7.3\ Server.x86_64/
enabled=1
gpgcheck=1
gpgkey=file:///run/media/root/RHEL-7.3\ Server.x86_64/RPM-GPG-KEY-redhat-beta,file:///run/media/root/RHEL-7.3\ Server.x86_64/RPM-GPG-KEY-redhat-release
保存,测试yum源
#yum clean all
#yummakecache
安装telnet
因为ssh是远程服务,如果不是在机房终端机,或者有带外管理的话,必须要临时安装一个远程工具,避免ssh无效后服务器无法远程访问了。
#yum search telnet需要安装以下两个telnet包(server端和client端)
telnet.x86_64 : The client program for the Telnet remote login protocol
telnet-server.x86_64 : The server program for the Telnet remote login protocol
#yum install telnet-server.x86_64
#yum install telnet.x86_64
telnet登录
确认telnet服务可用,包括开机自启动,避免万一。
启动telnet服务
# systemctl enable telnet.socke
# systemctl start telnet.socket
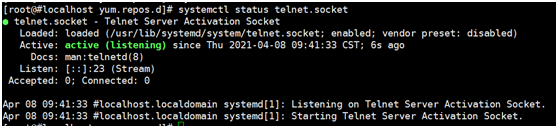
# systemctl status telnet.socket
配置pst类型终端到/etc/securetty
注:/etc/securetty文件允许你规定“root”用户可以从那个TTY设备登录,登录程序(通常是“/bin/login”)需要读取“/etc/securetty”文件。
它的格式是:列出来的tty设备都是允许登录的,注释掉或是在这个文件中不存在的都是不允许root登录的。
注释掉(在这一行的开头加上#号)所有你想不让root登录的tty设备。
tty就是tty,是一个很宽泛的名词,它是Teletype的缩写
如果你指的是/dev/tty,那指当前终端
pts是pesudotty slave,是伪终端的slave端 console好像是指当前的控制台(或者监视器),比如说你Ctrl+Alt+x,然后echo "123" > /dev/console,123总会显示在你的monitor上。
vc是virtual console,也可以理解为虚拟的监视器,当你Ctrl+Alt+x,就会切换到vc x,在/dev下面没有直接对应的设备文件,不过你如果尝试 echo "123" > /dev/vcs1, 你在monitor上也能看到,不过要切换到对应的vc。
vt指的是virtual terminal,虚拟终端,在我看来指的就是虚拟控制台
开启telnet的root登录
把/etc/securetty文件中的pts0 - pts3全部注释掉就可以了。
允许root用户telnet登录则需要添加上pst类型的终端。
如启动telnet服务后,root用户登录报如下错误,需要按照上述方式进行调整
# telnet 192.168.56.123
Trying 192.168.56.123...
Connected to 192.168.56.123.
Escape character is '^]'.

Kernel 3.10.0-514.el7.x86_64 on an x86_64
#localhost login: root
Password:
Login incorrect
调整完成后:
# telnet192.168.56.123
#localhost login: root
Password:
登录操作系统
查看openssh和openssl版本
# ssh -V
OpenSSH_6.6.1p1, OpenSSL 1.0.1e-fips 11 Feb 2013

# openssl version
OpenSSL 1.0.1e-fips 11 Feb 2013
备份并移除老文件
# mkdir -p /root/update
# cd /root/update
# cp-rp/etc/ssh/sshd_configsshd_config
# cp -rp /etc/pam.d/sshdsshd
# cp -rp /etc/ssl/ ./
# cp -rp /usr/bin/opensslopenssl
# cp -rp /etc/ssh /root/update
mv /usr/bin/openssl /usr/bin/openssl_bak

# yum remove openssl-devel
# rm -rf /etc/ssl
安装依赖包
# yum install gcc
# yum install gcc-c++
# yum install glibc
# yum install make
# yum installautoconf
# yum installpcre-devel
# yum install pam-devel
# yum install zlib-devel.x86_64
解压并安装openssl包
解压
# tar -xvf openssl-1.1.1j.tar.gz
# cd openssl-1.1.1j
配置
# ./config  --prefix=/usr/local --openssldir=/usr/local/ssl
Operating system: x86_64-whatever-linux2
Configuring OpenSSL version 1.1.1j (0x101010afL) for linux-x86_64
Using os-specific seed configuration
Creating configdata.pm
Creating Makefile

**********************************************************************
***                                                                ***
***   OpenSSL has been successfully configured                     ***
***                                                                ***
***   If you encounter a problem while building, please open an    ***
***   issue on GitHub <https://github.com/openssl/openssl/issues>  ***
***   and include the output from the following command:           ***
***                                                                ***
***       perl configdata.pm --dump                                ***
***                                                                ***
***   (If you are new to OpenSSL, you might want to consult the    ***
***   'Troubleshooting' section in the INSTALL file first)         ***
***                                                                ***
**********************************************************************
# echo $? -- 检查配置是否成功
编译安装
# make&& make install
# echo $? -- 检查编译安装是否成功
后续
# ln -s /usr/local/bin/openssl /usr/bin/openssl
# ln -s /usr/local/include/openssl /usr/include/openssl

# cat /etc/ld.so.conf
includeld.so.conf.d/*.conf

# echo "/usr/local/lib" >> /etc/ld.so.conf
# echo "/usr/local/lib64" >> /etc/ld.so.conf
# cat /etc/ld.so.conf
includeld.so.conf.d/*.conf
/usr/local/lib
/usr/local/lib64

# /sbin/ldconfig
# openssl version
OpenSSL 1.1.1j  16 Feb 2021
解压并安装openssh包
# rm -rf /etc/ssh
# cd /root/update

# tar -xvf openssh-8.5p1.tar.gz
# cdopenssh-8.5p1

# ./configure --prefix=/usr/ --sysconfdir=/etc/ssh  --with-openssl-includes=/usr/local/ssl/include --with-ssl-dir=/usr/local/ssl   --with-zlib   --with-md5-passwords   --with-pam
# echo $? -- 检查配置是否成功

# make clean
# make&& make install
# echo $? -- 检查安装是否成功

# cp -afcontrib/redhat/sshd.init /etc/init.d/sshd
# cp -afcontrib/redhat/sshd.pam /etc/pam.d/sshd.pam
# chmod +x /etc/init.d/sshd

# echo " HostKey /etc/ssh/ssh_host_rsa_key ">>/etc/ssh/sshd_config
#echo "HostKey /etc/ssh/ssh_host_ecdsa_key">>/etc/ssh/sshd_config
# echo "HostKey /etc/ssh/ssh_host_ed25519_key">>/etc/ssh/sshd_config
# echo"PermitRootLogin yes">>/etc/ssh/sshd_config
# echo"PasswordAuthentication yes">>/etc/ssh/sshd_config
# echo"ChallengeResponseAuthentication no">>/etc/ssh/sshd_config
# echo"UsePAM yes">>/etc/ssh/sshd_config
# echo"X11Forwarding yes">>/etc/ssh/sshd_config

# chkconfig --add sshd
# systemctl list-unit-files sshd.service
UNIT FILE    STATE
sshd.service enabled

1 unit files listed.

# mv /usr/lib/systemd/system/sshd.service /root/update/sshd.service
# chkconfigsshd on
Note: Forwarding request to 'systemctl enable sshd.socket'.
Created symlink from /etc/systemd/system/sockets.target.wants/sshd.socket to /usr/lib/systemd/system/sshd.socket.

# systemctl enable sshd
sshd.service is not a native service, redirecting to /sbin/chkconfig.
Executing /sbin/chkconfigsshd on
Note: Forwarding request to 'systemctl enable sshd.socket'.

# systemctl start sshd
# ssh -V
OpenSSH_8.5p1, OpenSSL 1.1.1j  16 Feb 2021
让SHA1继续可用的方法
在sshd配置文件里增加这个认证方法
HostKeyAlgorithms ssh-rsa